Editing Photos
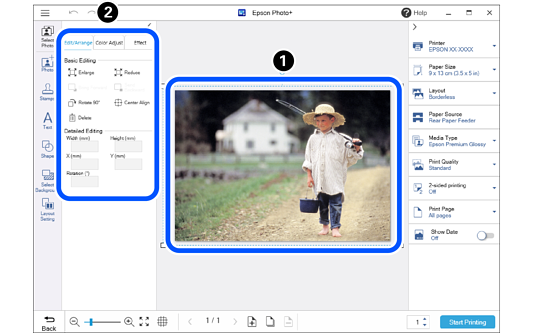
 Click the photo you want to edit.
 Click a tab to edit the photo.
|
Item |
Explanation |
|
|---|---|---|
|
Basic Editing |
Enlarge |
Enlarges the selected photo. |
|
Reduce |
Reduces the selected photo. |
|
|
Bring Forward |
Moves the selected photo one layer forward in the stack. |
|
|
Send Backward |
Moves the selected photo one layer back in the stack. |
|
|
Rotate 90° |
Rotates the selected photo 90 degrees clockwise. |
|
|
Center Align |
Moves the selected photo to align with the center of the paper. When multiple photos are selected, the center of all selected photos is aligned with the center of the paper. |
|
|
Delete |
Deletes the selected photo. |
|
|
Align |
Align Top |
This is displayed when you select photos, text boxes, stamps, shapes, and so on that were added using Photo. When only one item is selected, it is aligned with the top, bottom, left, right, or center of the paper. When multiple items are selected, they are aligned so that the top, bottom, left, right, or center are aligned with each other. |
|
Align Bottom |
||
|
Align Center Vert. |
||
|
Align Center Horiz. |
||
|
Align Left |
||
|
Align Right |
||
|
Detailed Editing*1 |
Width |
Adjusts the size of the selected photo or item. When adjusting an item with a fixed aspect ratio, changing either the Width or Height automatically adjusts the other dimension accordingly. |
|
Height |
||
|
X |
Adjusts the position (distance from the center point) of the selected photo or item. X represents the horizontal direction, and Y represents the vertical direction. |
|
|
Y |
||
|
Rotation |
Sets the rotation angle of the selected photo. |
|
|
Apply Edits to Same Photos |
Click this to apply adjustments made to the photo, other than its orientation, to all of the photos. This is available when editing photos using the ID Photo menu. |
|
*1You cannot adjust photos selected on the Select Photos screen using Detailed Editing.
The Color Adjust tab is only displayed when you select a photo in JPEG or TIFF format.
|
Item |
Explanation |
||
|---|---|---|---|
|
Auto Correction |
Off |
Photos are not corrected. |
|
|
PhotoEnhance |
This feature allows you to automatically print high quality images using Epson's own image analysis/processing technology. Select the correction mode according to the subject of the photo. |
||
|
(PhotoEnhance correction mode) |
Standard |
Performs optimum finishing according to the photo. |
|
|
People |
Ideal for photos in portrait. |
||
|
Landscape |
Ideal for photos of blue skies and green landscapes. |
||
|
Night Scene |
Ideal for photos at night. |
||
|
B&W |
Adjusts photos to black and white (grayscale). |
||
|
Sepia |
Adjusts photos to white and dark brown (sepia). |
||
|
Backlight |
Adjusts darker subjects so that they are brighter. |
||
|
Correction Strength |
Adjusts the effect of the selected correction mode. |
||
|
Brightness |
Adjusts the brightness of the photo. |
||
|
Contrast |
Adjusts the contrast ratio of the photo. |
||
|
Saturation |
Adjusts the saturation (color vividness) of the photo. |
||
|
Sharpness |
Emphasizes and sharpens the outline of the photo. |
||
|
Reset |
Returns the adjusted value to its initial value. |
||
|
Item |
Explanation |
|
|---|---|---|
|
Transparency |
Adjusts the transparency of the photo. |
|
|
Blur |
Adjusts the blurriness of the photo. |
|
|
Reset |
Returns the adjusted value to its initial value. |
|
|
Crop |
This is only displayed when you select a photo that was added using Photo. You can select the cropping pattern for the photo and adjust the cropping range and position. |
|
|
Replace image |
This is only displayed when you select a photo that was added using Photo. You can replace the photo. |
|