Printing Disc Labels
This section explains how to create the following disc label as an example.

-
Select the printer, and then click CD/DVD.

-
Select a frame, and then click Next.
 Note:
Note:Frames with an
 icon have not yet been downloaded from the Web site. Connect to the Internet to use these.
-
Click OK.

-
Select photos, and then click OK.
You can check the selected photos in the photo list on the right.

-
Click
 to make print settings for the CD label.
Click
 to set the inner and outer diameters.
Click
 to adjust the print position.

-
Click
 in Disc Setting, or click the gray area outside the frame to finish making layout settings.
-
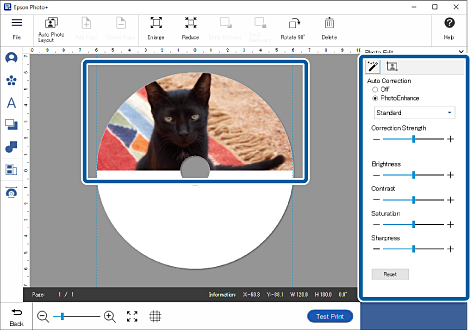
Click the photo to adjust its position, size, and so on.
You can adjust the position by dragging the photo. You can also use the buttons at the top of the screen to enlarge, reduce, and rotate the photo.

-
Click the photo to adjust its brightness and so on.
Click
 to adjust the brightness, contrast, and so on of the photos.
Click
 to adjust the transparency and blurriness of the photo.

-
Click
 in Photo Edit, or click the gray area outside the frame to deselect the photo.
-
Add stamps, text, and so on.
See the following for more details.

-
Make print settings, and then click Start Printing.
 Note:
Note:See the "User's Guide" supplied with the printer for details on loading the disc into the printer and making print settings.